
In this post we are going to see from sratch how to deploy a solution to an Azure Web App using the new Visual Studio Online Build platform.
To do it, we will use only the web portal of VSO.
Connect Azure to VSO
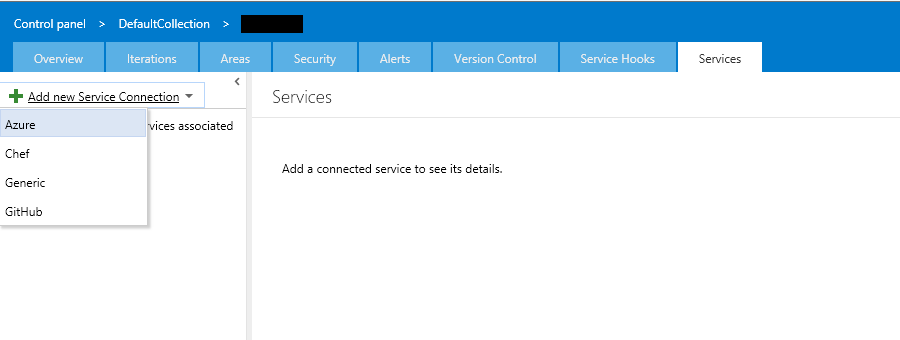
First of all we have to let Visual Studio Online know that we have an Azure account we want to use as deploy endpoint for our solution. Go the the Team Peoject Settings page (clicking on the button in the upper right corner of the project page), click on the "Services" tab, then on "Add new Service Connection" and then on "Azure".
At this point a pop-up will appear and we have to insert the ID of the Azure subscription which contains or will contain the Web App to publish, a name for it and the authentication mode.
We can use either a subscription certificate or the credentials.
When done, our Azure subscription and our VSO account will be connected (for this project).
Create the build definition
Now that we have linked VSO and Azure, let's go to the Build section of the project and create a new deployment build definition.

We eant to deploy to Azure, so in the "Deployment" section click on "Azure Website" (like shown in the image).
This creates a new build definition with some steps to configure.
Let's see how to proceed step-by-step.

The first one is the "real" build task. It's completely customizable but the most important thing is to define the solution file it has to use as build source. Select it like shown in the image, near the red arrow.
In the second step we have to set the how to execute the post-build Unit Tests. If we don't have unit tests (that is bad...) or we don't want to execute them (also this is bad :) ), we can safely remove this step using the "X" button that appears when the mouse pointer is over it.
The third step is the most important one for our scenario, because it publishes the build result to the Azure Web App.

In its settings there is a drop down where to select the target Azure subscription (if the previous Azure service connection worked properly). Then, in the "Web App Name" textbox, we have to write the name of the Web App we want to deploy. In theory this also appears as a drop down itself, but currently it doesn't load the existent Web Apps names (don't forget that the new Build platform is still in preview)
For this reaso, here I've written down some notes about the Web App name
- If we use a non-existent Web App name, it will create it on our Azure subscription using the selected region
- If we use a Web App name that doesn't exist in our subscription but which already exist in the selected region, the deploy process will fail
- If we use a Web App name that already exists in our subscription but it is in a region different from the selected one, the deploy process will fail
- If we use a Web App name that already exists in our subscription and it is in the selected region, the deploy will use it as target and will update it.
So pay attention about what we write :)
The two remaining steps allow us to index and to publish the application symbols (suggested, to have more information in the case of unhandled exceptions) and to publish the build artifacts somewhere.
When all the parameters are set we can go ahead and save our build definition, giving it a name.
We can also change all the default parameters in the upper tabs to customize the build process accordingly our needs.
Let's deploy!
Now that we have completed all the customizations, it's the moment to launch the build and to verify that the deploy works fine.
To start the build, click on the "Queue build" button in the build definition toolbar or in the contextual menu.

When we click on that button, VSO will queue a build based on our build definition and will execute it either on our servers or in a Microsoft Datacenter (if we have chosen to do it with the hosted agents).
Anyway, the build progress will be shown in the real time web console that appears as soon as the build is queued.
When is starts, it firstly execute the build and test tasks:

Then, if both are successful, the deploy to Azure:

When all the tasks will successfully finish, we have our web application deployed and running on Azure. Easy!
No comments:
Post a Comment