Friday, December 19, 2014

Source Code file editing with Visual Studio Online

Brian Harry, on his blog, has announced the new release of Visual Studio Online. One of the new features is the long-awaited code edit directly from the web portal.
Let see how it works.
 
 
Edit
On the Team Project's Dashboard, go to the "Code" section and click on a source code file from the tree menu on the left.
 
As ever, the read-only source code box will appear on the right pane. Unlike what happened previously, however, there is a new "Edit" button.
 
 
Clicking on it, three things happen:
  1. The toolbar changes
  2. In the tree left menu the selected file is marked with a * to let you know it's in editing mode
  3. In the right pane is now possible to edit the source code


When the editing is completed, it's possible (recommended...) to write a comment for the checkin into the textbox and then click on the "Save" button of the toolbar.
 
Click on "Save", the changes will be saved in the source control; it creates a changeset and shows a tooltip with the info about the result of the operation and a link to the changeset view page.
 
 
It's also possible to cancel the editing, just click on the "Discard" button in the toolbar.
Finally, if we want to verify our changes before doing the checkin, we can make a diff between the file on the source control and our version with the button on the far right of the toolbar.


Upload, Create, Rename, Delete
In addition to directly edit the source code, you can also rename, delete and create a file or folder and upload new files.
 
 
To creare a new file or upload it, just right click on a folder and choose "Add file(s)".
A popup will open, here you can select to create a new file or to upload existing files.
 
 
To cancel a file or folder right click on it and click on "Delete" from the contextual menu (it asks for the confirm).
 
Finally, to rename it click on "Rename" in the same contextual menu.
 
All these operations will generate a changeset, so all the changes will be mapped and historicised on the source control.

Wednesday, November 12, 2014

Adding Azure Application Insights to a Web Site

If you're developing a Web Application, you can use Visual Studio 2013.3 to automatically add all the libraries and configurations that "Azure Application Insights" needs to work.
 
But what about Web Sites? If you create a Web Site (or you have to manage / update one) you'll notice that you don't have such option. So, what can we do it? How can we achieve the same results? How can we integrate Azure Application Insights to a Web Site?
 
Just follow these steps:
  1. Create a new "Application Insights" service using the new Azure portal (preview)
  2. Copy the JavaScript code snippet proposed by the portal and add it to all the pages you want to monitor (or to the master page, if you have one)
  3. In Visual Studio 2013.3, create a new empty web application and add to it the Application Insights using the contextual menu
  4. Copy the following files from the "bin" folder of the Web App to the "bin" folder of the Web Site:
    Microsoft.ApplicationInsights.dll
    Microsoft.ApplicationInsights.Extensibility.RuntimeTelemetry.dll
    Microsoft.ApplicationInsights.Extensibility.Web.dll
    Microsoft.Diagnostics.Tracing.EventSource.dll
    (if you want you can copy also the related .xml and .pdb files)
    
  5. Return to the Azure portal (preview), go to the Application Insights service you've created before, click on the "Properties" button and copy the value of "Instrumentation Key" textbox
  6. Copy the ApplicationInsights.config file from the root of the Web App to the root folder of the Web Site
  7. In this file, replace the value of the "InstrumentationKey" key with the one copied at point 5
  8.  Change the web.config of the website adding these rows:
    <system.web>
     [...]
        <httpModules>
       [...]
          <add name="ApplicationInsightsWebTracking" type="Microsoft.ApplicationInsights.Extensibility.Web.RequestTracking.WebRequestTrackingModule, Microsoft.ApplicationInsights.Extensibility.Web" />
       [...]
        </httpModules>
     [...]
    </system.web>
    
    <system.webServer>
     [...]
        <validation validateIntegratedModeConfiguration="false" />
     [...]
     <modules runAllManagedModulesForAllRequests="true">
       [...]
          <remove name="ApplicationInsightsWebTracking" />
          <add name="ApplicationInsightsWebTracking" type="Microsoft.ApplicationInsights.Extensibility.Web.RequestTracking.WebRequestTrackingModule, Microsoft.ApplicationInsights.Extensibility.Web" preCondition="managedHandler" />
       [...]
        </modules> 
     [...]
    </system.webServer> 
    
 
Now you can test your Web Site and, after few seconds, you will see you analytics data in the Application Insights blade of the new Azure portal (preview)

Tuesday, November 11, 2014

Manage Cloud Load Tests with the REST API

The Cloud-based Load Testing (CLT) REST APIs give you the ability to execute Load tests from the Cloud in an automated manner, that can be integrated either as part of your Continuous Integration/Deployment pipeline or Test Automation.

Here’s a list of what you can do with these new APIs:
  • Create/Start/Stop a Load Test Run
  • Get Load Test Results  - the set of KPIs groups that you are used to – Performance, Throughput, Application
  • Get Messages from the service during a run
  • Get Exceptions, if any, from the service during a run
  • Get Counter instances and Samples for a Load Test run
  • Get Application Counters for Apps configured with your load test
  • Get list of all past Load test Runs - filtered by requester, date, status etc..
Those APIs work strictly with Azure APIs because they expect to upload files from Azure Blob and to download results to the same drop folder in Azure Blob.

Please note that:
  • For using the REST APIs, you’ll need to enable alternate credentials, and use that for authentication
  • Add "vsclt" to your account name to get redirected to the Cloud-based Load Test (CLT) service within visualstudio.com. If your account is https://abc.visualstudio.com/, then when using APIs, specify this as https://abc.vsclt.visualstudio.com/
 
The base API pattern is:
VERB    https://{account}.vsclt.visualstudio.com/_apis/clt/{resource}[/{options}]
 
Where "resource" can be one of the following and "options" depend on the resource:
 
Test
  • for "Test Runs" (queued test runs): testruns
  • for "Test Drops" (the tests store containers): testdrops
 
Depending on Test Runs
  • for "Counter Instances": testruns/{testrunid}/counterinstances
  • for "Counter Samples": testruns/{testrunid}/countersamples
 
Application Performance Management:
  • for "APM Plugins": apm/plugins
  • for "APM Applications ": apm/applications
  • for "APM Counters ": apm/counters

Create a Test Run
To create a Cloud Load Test Run, you have to make a POST call to the API, passing a set of parameter and test settings like in the example below.

Request Url:
POST    https://dbtek.vsclt.visualstudio.com/_apis/clt/testruns

Request Body:
{
  "name": "MyAppToTest.loadtest",
  "description": "nightly loadtest",
  "testSettings": {
    "cleanupCommand": "",
    "hostProcessPlatform": "x86",
    "setupCommand": ""
  },
  "testDrop": {
    "id": "fe35ed32-eaab-4178-ba7e-ad2577ee187f"
  }
}


Response:
{
  "id": "a5e0d4b9-d387-4b3e-9566-163da9c39b67",
  "name": "MyAppToTest.loadtest",
  "createdDate": "2014-11-1T08:51:27.0965365Z",
  "state": "pending",
  "subState": "none",
  "testSettings": {
    "cleanupCommand": "",
    "hostProcessPlatform": "x86",
    "setupCommand": ""
  },
  "testDrop": {
    "id": "fe35ed32-eaab-4178-ba7e-ad2577ee187f",
    "url": "https://dbtek.vsclt.visualstudio.com/_apis/clt/TestDrops/fe35ed32-eaab-4178-ba7e-ad2577ee187f"
  },
  "runSpecificDetails": {
    "duration": 180,
    "virtualUserCount": 250,
    "samplingInterval": 15
  },
  "createdBy": {
    "id": "76cabfe4-0e20-4f5b-862e-9693a68232f1",
    "displayName": "iamtheuser@dbtek.it"
  },
  "url": "https://dbtek.vsclt.visualstudio.com/_apis/clt/testruns/a5e0d4b9-d387-4b3e-9566-163da9c39b67"
}


As you can see, in the response you'll find all the data you need related to the newly created test run.

Start a Test Run
With those data, we can for example start (queue) the test run, calling the API with a PATCH verb:

Request Url:
PATCH    https://dbtek.vsclt.visualstudio.com/_apis/clt/testruns/a5e0d4b9-d387-4b3e-9566-163da9c39b67

Request Body:
{
  "state": "queued"
}


Response:
Status code: 202


Get Test results
Finally, when the test finished, we can get the test run results, with a GET call.

Request Url:
GET    https://dbtek.vsclt.visualstudio.com/_apis/clt/testruns/a5e0d4b9-d387-4b3e-9566-163da9c39b67/results

Response:
{
  "resultsUrl": "http://127.0.0.1:10000/devstoreaccount1/ets-containerfor-aeee0697-d734-43d7-956e-e662252c265c/2150fbd4-e71c-42fd-8b90-95222a556d87/TestResult/LoadTest.ltrar.zip?sv=2012-02-12&se=2014-06-03T05%3A05%3A39Z&sr=b&si=sas_tenant_policyaeee0697-d734-43d7-956e-e662252c265c&sig=n1Tj%2BsCtiOqQu9UtcXsl%2Bn3ixP%2FVebHCKDJvfD5Tr%2FE%3D",
  "counterGroups": {
    "count": 3,
    "value": [
      {
        "groupName": "Performance",
        "url": "https://dbtek.vsclt.visualstudio.com/_apis/clt/testruns/a5e0d4b9-d387-4b3e-9566-163da9c39b67/CounterInstances?groupNames=Performance"
      },
      {
        "groupName": "Throughput",
        "url": "https://dbtek.vsclt.visualstudio.com/_apis/clt/testruns/a5e0d4b9-d387-4b3e-9566-163da9c39b67/CounterInstances?groupNames=Throughput"
      },
      {
        "groupName": "Application",
        "url": "https://dbtek.vsclt.visualstudio.com/_apis/clt/testruns/a5e0d4b9-d387-4b3e-9566-163da9c39b67/CounterInstances?groupNames=Application"
      }
    ]
  }
}


Get Test errors
You can also retrieve a list of errors that eventually happened during the test. Again, use a GET call.

Request Url:
GET    https://dbtek.vsclt.visualstudio.com/_apis/clt/testRuns/47be20f0-ac4a-40cd-acb7-d9f8c44d0404/Errors

Response:
{
  "count": 2,
  "value": [
    {
      "type": "Exception",
      "subType": "UriFormatException",
      "occurrences": 50,
      "testCaseName": "ErrorsAndExceptionsWebTest",
      "scenarioName": "LoadTestingScenarioWarmupDuration",
      "request": "http://www.bing:123.com/----{GET}",
      "stackTrace": "   at System.Uri.CreateThis(String uri, Boolean dontEscape, UriKind uriKind)\n   at System.Uri..ctor(String uriString, Boolean dontEscape)\n   at Microsoft.VisualStudio.TestTools.WebStress.WebTestTransaction..ctor(String requestUrl)\n   at Microsoft.VisualStudio.TestTools.WebStress.WebTestInstrumentedTransaction.CreateTransaction()\n   at Microsoft.VisualStudio.TestTools.WebStress.WebTestInstrumentedTransaction.Execute(WebTestCaseContext testCaseContext, AsyncCallback completionCallback, Object callerState)",
      "messageText": "Invalid URI: Invalid port specified.",
      "lastErrorDate": "2014-11-11T09:14:20.363Z"
    },
    {
      "type": "ExtractionRuleError",
      "subType": "ExtractText",
      "occurrences": 50,
      "testCaseName": "ErrorsAndExceptionsWebTest",
      "scenarioName": "LoadTestingScenarioWarmupDuration",
      "request": "http://www.bing.com/----{GET}",
      "stackTrace": "",
      "messageText": "StartsWith text was not found in the response",
      "lastErrorDate": "2014-11-11T09:14:23.663Z"
    }
  ]
}

Thursday, October 30, 2014

Place the Database under Source Control - free eBook

Normally, a Source and Version control system shows huge benefits in coordinating the efforts of the development team, ensuring a complete audit trail of all changes to the code files, and allowing the team to reproduce any specific revision or build.

Database developers can and should also benefit from source control's audit history and change-tracking capabilities, but there's more to it than simply placing a few database build scripts into a subfolder of the application development team's project folder in source control. Unlike application developers, database developers are not assembling files into a neat little application package, but are instead running scripts that feed off each other and off existing database objects, while negotiating the close interdependency between the code and the data.

To cover what we can call "Database Lifecycle Management", and consider it a branch of ALM, RedGate has developed an interesting free ebook, called "SQL Server Source Control Basics"

Unfortunately, the book's authors decided to use SVN, but you can take the core concepts and bring them to Team Foundation Server or Visual Studio Online as well.

Topics include:
  • Source control core concepts
  • Choosing a database version control system and structure
  • Branching and merging strategies
  • Automating database versioning and deployment from source control
  • An introduction to database continuous integration


The eBook gives a detailed walkthrough of database source control concepts, with code samples and clear examples.

You can download it, for free, here:

Tuesday, October 28, 2014

Visual Studio Online REST API version 1.0

Today the first official version of the REST API of Visual Studio Online has been released, the version 1.0.

Announced in May as preview, now these APIs have reached a great maturity. This doesn't mean that they are done with the APIs completely but rather that a core set are now complete and from here forward, they’ll be versioning them for backward compatibility so all the apps that use them don’t break every time they update them. 

Together with this announce, they have updated the "API Reference portal" and the "Getting started guide".

Important
If you have existing apps using the 1.0 preview APIs, you should start migrating to the release 1.0 APIs as soon as possible. Graduated preview APIs (any API in the 1.0 set) are subject to stop working in 12 weeks from today. To learn more about versioning and migrating, see the "versioning and migration page".

That said, remember that, starting from today, the Visual Studio Online REST APIs follow this pattern:

VERB https://{account}.VisualStudio.com/DefaultCollection/_apis[/{area}]/{resource}?api-version=1.0

Monday, October 13, 2014

Integrate an application or a service with Visual Studio Online - MSDN Guest Post

On friday was published on MSDN Italy my second Guest post in which I talk about how is possible and easy to integrate our applications or services with Visual Studio Online using the new REST APIs and the Service Hooks.

To read the whole article (available only in italan) just clik on this link:

Monday, October 6, 2014

Easily migrate from Team Foundation Server to Visual Studio Online - MSDN Guest Post

Today was published on MSDN Italy my Guest post in which I explain how to migrate from a Team Foundation Server (the normal on-premises installation scenario) to its corresponding on-cloud version Visual Studio Online and which are the reasons that could push to do so.

To read the articlae (available only in italan) just clik on this link:

Tuesday, September 30, 2014

Create a Work Item using REST API - Visual Studio Online

Sometimes it can be useful to add a new Work Item to our Team Project programmatically, maybe in response of a certain event and so on.

The new "WIT REST API v1.0 (preview 2)" (released on September 4) exposed by Visual Studio Online allow us to do it.

When you create a work item, you can provide values for any of the work item fields.

To use them, you have to send a HTTP PATCH request to:

https://your_account.visualstudio.com/defaultcollection/team_project_name/_apis/wit/workitems/$work_item_type_name?api-version=1.0-preview.2

The request body has to be set using this format:

[
    {
        "op": "add",
        "path": { string }
        "value": { string or int, depending on the field }
    },
    {
        "op": "add",
        "path": "/relations/-",
        "value":
        {
            "rel": { string },
            "url": { string },
            "attributes":
            {
                { name/value pairs }
            }
        }
    }
]

An example request could be:

https://myAccount.visualstudio.com/defaultcollection/myProject/_apis/wit/workitems/$task?api-version=1.0-preview.2

[
  {
    "op": "add",
    "path": "/fields/System.Title",
    "value": "Change blog title height"
  }
]

This request produces a response like this one, in which you'll find all the informations related to newly created Work Item:

{
  "id": 88,
  "rev": 1,
  "fields": {
    "System.AreaPath": "myProject",
    "System.TeamProject": "myProject",
    "System.IterationPath": "myProject",
    "System.WorkItemType": "Task",
    "System.State": "To Do",
    "System.Reason": "New task",
    "System.CreatedDate": "2014-09-30T10:25:12.943Z",
    "System.CreatedBy": "Davide Benvegnu",
    "System.ChangedDate": "2014-09-30T10:25:12.943Z",
    "System.ChangedBy": "Davide Benvegnu,
    "System.Title": "Change blog title height"
  },
  "_links": {
    "self": {
      "href": "https://myAccount.visualstudio.com/DefaultCollection/_apis/wit/workItems/88"
    },
    "workItemUpdates": {
      "href": "https://myAccount.visualstudio.com/DefaultCollection/_apis/wit/workItems/88/updates"
    },
    "workItemRevisions": {
      "href": "https://myAccount.visualstudio.com/DefaultCollection/_apis/wit/workItems/88/revisions"
    },
    "workItemHistory": {
      "href": "https://myAccount.visualstudio.com/DefaultCollection/_apis/wit/workItems/88/history"
    },
    "html": {
      "href": "https://myAccount.visualstudio.com/web/wi.aspx?pcguid=0fa87894-6f48-4458-957d-3438b6bb9343&id=88"
    },
    "workItemType": {
      "href": "https://myAccount.visualstudio.com/DefaultCollection/c4637008-2068-4b3f-828d-a214e2ba5210/_apis/wit/workItemTypes/Task"
    },
    "fields": {
      "href": "https://myAccount.visualstudio.com/DefaultCollection/_apis/wit/fields"
    }
  },
  "url": "https://myAccount.visualstudio.com/DefaultCollection/_apis/wit/workItems/88"
}

Friday, September 12, 2014

About Azure Websites Extensions

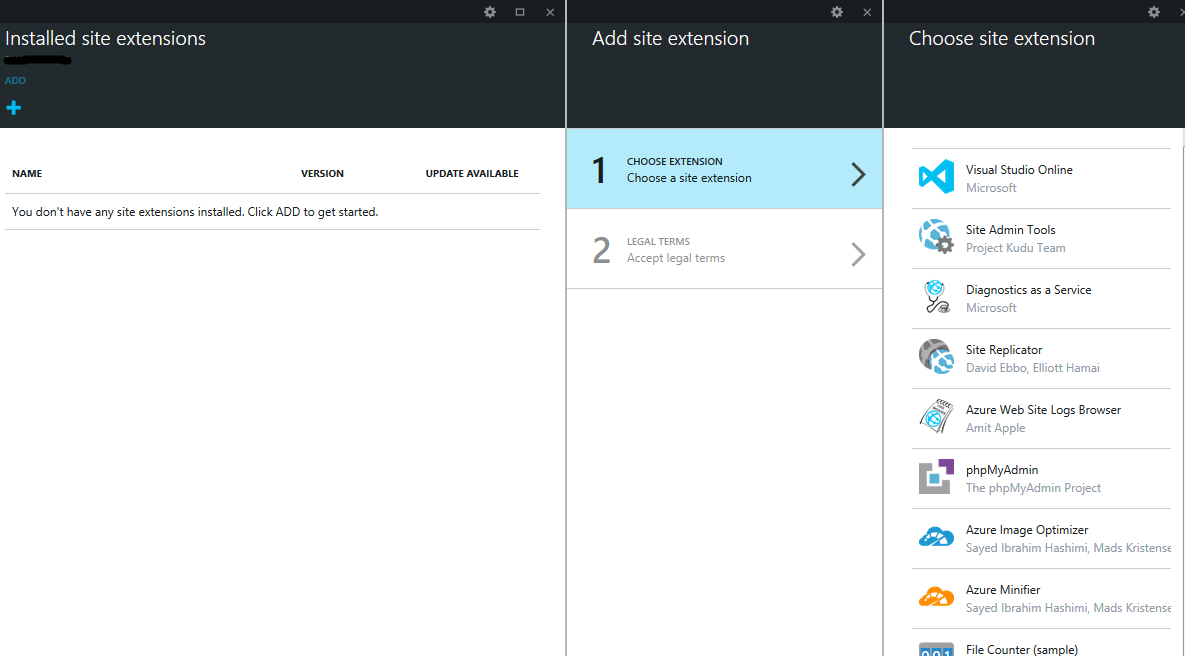
Each Azure Website provides an extensible management end point that allows you to leverage a powerful set of tools, deployed as site extensions. These tools range from source code editors like Visual Studio Online to management tools for connected resources such as a MySQL database connected to a website. 

Site extensions are web apps with simple metadata for extension registration. Site Extensions can be authored for any development stack supported by the Azure Websites platform.

Existing site extensions are available for each website in the Azure Preview Portal:


To add a new site extension go to the Configuration lens under the web site section, click the ADD button and select an extension from the list. Each of these extensions are made available by the publisher listed under extension name and legal terms provided by each publishers have to be accepted before installing an extension.


Once added, site extension content is copied under the %HOME%\SiteExtensions folder parallel to website root. Note that adding a site extension will restart the site.


If you need something that isn't already present, you can create new site extensions for use with your websites based on instructions at this link
It's also possible to submit new site extensions for availability across the Azure Websites platform through the Site Extension Gallery submission portal: http://www.siteextensions.net.

Tuesday, August 19, 2014

Azure Web Sites Deployment: how does it work?

Azure Web Sites supports continuous deployment from source code control and repository tools like BitBucket, CodePlex, Dropbox, Git, GitHub, Mercurial, and TFS/VSO. You can use these tools to maintain the content and code for your web site, and then quickly and easily push changes to your site when you want.

Supported Deployment types
Pushing local files to Azure by using Local Git allows you to manually push updates from a local project to your Azure Web Site, while deploying from BitBucket, CodePlex, Dropbox, GitHub, or Mercurial results in a continuous deployment process where Azure will pull in the most recent updates from your project.

While both methods result in your project being deployed to an Azure Web Site, continuous deployment is useful when you have multiple people working on a project and want to ensure that the latest version is always published regardless of who made the most recent update. Continuous deployment is also useful if you are using one of the above mentioned tools as the central repository for your application.

On the net there are plenty of articles explaining how to deploy an Azure WebSite (i.e. http://azure.microsoft.com/en-us/documentation/articles/web-sites-deploy/) or how to implement Continuous Deployment strategies (i. e. http://azure.microsoft.com/en-us/documentation/articles/web-sites-publish-source-control/).

But how does it work behind the scenes?

Well, the answer is "Kudu".

Kudu is the engine behind deployments in Azure Web Sites, but it can also run outside of Azure.
It has a somewhat unusual architecture, in the sense that it is a single-tenant rather than multi-tenant service. What this means is that each Azure Web Site has its own instance of the Kudu service, completely distinct from the Kudu service sites used for other Azure sites.

It stays active in background and "watches" for checkins, commits, new files, completed builds and so on. When it detects something, KuduSync starts and do the "dirty work".

It's a great tool, because:
  • it’s an open source project available on GitHub (https://github.com/projectkudu/kudu)
  • it's automatically installed on all Windows Azure Web Sites
  • it can use a custom deployment script

But the most important thing (imho) is this:
The deployment is created in your website’s folder structure and the new deployment is copied to your site’s root, leaving old deployments intact.
This means you can "rollback" to any deploy you've done in the past. This, for me, it's a killer feature!

It's also possible to have access to the Kudu web dashboard, using an url like "https://your_website_name.scm.azurewebsites.net/" and your deployment credentials or your Azure service admin credentials.

Kudu Dashboard
In the Kudu dashboard you can find a lot of useful informations about your website's environment together with a set of tools to manage your website and, last but not least, a complete set of REST APIs. There is also the possibility to manage WebSites extensions.

There is also a great video where David Ebbo and Scott Guthrie explain how Kudu works: http://channel9.msdn.com/Shows/Azure-Friday/What-is-Kudu-Azure-Web-Sites-Deployment-with-David-Ebbo

Wednesday, August 6, 2014

Azure WebSite, Cloud Service and Virtual Machine: which to choose?

Sometimes it happens to start a new development project or to plan a deploy on the cloud, on Azure, but you don't know what kind of service is better to use: a WebSite, a Cloud Service or a Virtual Machine? What pros and cons do they have?

Let's deiscover the main differences.

Warning: this post is updated with the information available to August 5th, 2014.

First of all, a diagram (the same that Microsoft uses in the Azure official docs), to compare our three services:

Courtesy of Microsoft

In this image the "simplicity / control" ratio between services is quite clear. To be extremely synthetic:

  • WebSite: 
    • Solution extremely simple to use, it offers a good set of tools to support (monitoring, alerts, stairs, etc) but at the expense of the level of customization and control over the configuration. 
    • In multi-tier applications, it provides support to the only web tier
  • Cloud Service:
    • Less simple to use and deploy compared to Websites, provides a much greater level of control.
    • Also in this case there are several tools for monitoring and support already included
    • You can use both WebRoles (that actually are dedicated VMs with IIS installed) as well as WorkerRoles (always dedicated VMs, but without IIS. You can think about WorkerRole as a Windows Service)
    • In multi-tier scenarios, you can use a combination of WebRole and WorkerRole to implement the web tier, the middle-tier and the backend
    • In multi-tier, you can scale the frontend and the backend independently
  • Virtual Machine:
    • Leaves the configuration and customization completely to the user, so it's more complicated to manage but provides the highest level of control possible, as with the on-premises server.
    • You can use it for any kind of application and architecture
    • You need to manually deal with the management of the system, including upgrades, security policies, etc. etc.
    • It's the ideal choice in complex scenarios or when you need to host software or services that are not supported in WebSites or Cloud Servives.

This is the official services features comparison table:

FEATUREWEB SITESCLOUD SERVICES
(WEB ROLES)
VIRTUAL MACHINES
Access to services like Service Bus, Storage, SQL Database
XXX
Host web or web services tier of a multi-tier architecture
XXX
Host middle tier of a multi-tier architecture
XX
Integrated MySQL-as-a-service support
X1X
Support for ASP.NET, classic ASP, Node.js, PHP, Python
XXX
Scale out to multiple instances without redeploy
XX2
Support for SSL
3XX
Visual Studio integration
XXX
Remote Debugging
XXX
Deploy code with TFS
XXX
Deploy code with GIT, FTP
XX
Deploy code with Web Deploy
X4X
WebMatrix support
XX
Near-instant deployment
X
Instances share content and configuration
X
Scale up to larger machines without redeploy
X
Multiple deployment environments (production and staging)
XX
Network isolation with Azure Virtual Network
XX
Support for Azure Traffic Manager
XXX
Remote desktop access to servers
XX
Ability to define/execute start-up tasks
XX
Automatic OS update management
XX
Integrated Endpoint Monitoring
XXX
Seamless platform switching (32bit/64bit)
XX
1 Web or worker roles can integrate MySQL-as-a-service through ClearDB's offerings, but not as part of the Management Portal workflow.
2 Although Virtual Machines can scale out to multiple instances, the services running on these machines must be written to handle this scale-out. An additional load balancer must be configured to route requests across the machines. Finally, an Affinity Group should be created for all machines participating in the same role to protect them from simultaneous restarts from maintenance or hardware failures.
3 For Web Sites, SSL for custom domain names is only supported for standard mode. For more information on using SSL with Web Sites, see Configuring an SSL certificate for an Azure Web Site.
4 Web Deploy is supported for cloud services when deploying to single-instance roles. However, production roles require multiple instances to meet the Azure SLA. Therefore, Web Deploy is not a suitable deployment mechanism for cloud services in production.

If you want to take a llok at the complete services comparison, see the guide on the official Azure documentation.

Wednesday, July 30, 2014

Dedicated IP address on Azure Websites

When you share the IP address with some other websites / clients / customers (like it happens on a multi-tenant environment), you could have some problems like, for instance, have your IP blacklisted because of other sites' content.

The only reliable way to resolve this and protect your site from a recurrence is to configure your site with a dedicated IP. This means that the site will be using its own IP, which would not be shared with other sites. 

In Azure, you can easily get a dedicated IP by configuring IP SSL. This option is available only to the sites in the Standard tier, but if you’re using a custom Domain on your site, there are some extra considerations.

If you are using a custom domain and have a CNAME record pointing from it to the site’s name in Azure (for example, mysite.azurewebsites.net), then it’s rather simple – just change the record with your DNS provider and then configure IP-SSL.

If, on the other hand, you are using an A-record to resolve the host name to an IP, it's recommended to follow these steps:

  1. Change your hostname mapping (i.e. www.mysite.com) from an A record to a CNAME pointing to your Microsoft Azure Web Site (i.e. mysite.azurewebsites.net).  This should have no downtime as it will be pointing to the same IP. Wait some time for DNS replication to take place.
  2. Upload a certificate for www.mysite.com to your website. This can be accomplished under Domain names in the Configure tab. Usually, you would have to purchase the Certificate from a Certificate provider, but if you don’t intend to actually use SSL, you can use a self-signed certificate which is easy to generate and won’t cost you a dime.
  3. Configure an IP Based SSL binding for www.mysite.com. This option is available under SSL Binding in the Configure tab. See the section Configure SSL in the Azure guide for SSL.

Tuesday, July 22, 2014

Visual Studio Online now supports Azure Active Directory

Yesterday the Microsoft's vsalm team began deployment of the sprint 68 work.

The biggest thing in the announcement is the next step in the rollout of Azure Active Directory (AAD) support in VS Online.  They started this journey back in May with the very first flicker of AAD support at the Build conference.  Then they added more support at TechEd but they've stay pretty quiet about it because, until this week, there was no way to convert and existing account to AAD.  With this deployment they’ve enabled it.  Officially it’s in preview and you have to ask to get access to do it but they’re accepting all requests so it’s nothing more than a speed bump to keep too big a rush from happening all at once.  With these last set of changes, you can:


  • Associate your OrgID (AAD/AD credentials) with your MSDN subscription, if you have one, and use that to grant your VSO license
  • Create a new account bound to an AAD tenant
  • Bind an existing account to an AAD tenant
  • Unbind an account from an AAD tenant
  • Log in with either a Microsoft Account or and OrgID (AAD only or synchronized from you on prem Active Directory) giving you single sign-on with your corporate credentials, Office 365, etc.
To see all the details about AD support and other things included in the update, read the original post on MSCD by Brian Harry.

Monday, July 14, 2014

ASP.net MVC ActionLink with Image: Part 3 (Ajax)

In my previous posts we've seen how to implement some custom helpers to add  Bootstap Glyphs or Images to ActionLinks.

Now we're going to see how to do the same thing but with Ajax support too.

The basic things to do is to build the html code taking care of all the "ajax-related stuff" that the normal Ajax.ActionLink helper adds.

In this example I used the glyph as image, but you can use the same approach also with the normal images.

/// <summary>
/// Create an Ajax.ActionLink with an associated glyphicon
/// </summary>
/// <param name="htmlHelper"></param>
/// <param name="linkText"></param>
/// <param name="actionName"></param>
/// <param name="controllerName"></param>
/// <param name="glyphicon"></param>
/// <param name="routeValues"></param>
/// <param name="htmlAttributes"></param>
/// <returns></returns>
public static MvcHtmlString ImageActionLink(this AjaxHelper ajaxHelper, string linkText, string actionName, string controllerName, string glyphicon, AjaxOptions ajaxOptions, RouteValueDictionary routeValues = null, object htmlAttributes = null)
{
 //Example of result:           
 //<a id="btnShow" href="/Customers/ShowArtworks?customerId=1" data-ajax-update="#pnlArtworks" data-ajax-success="jsSuccess" 
 //data-ajax-mode="replace" data-ajax-method="POST" data-ajax-failure="jsFailure" data-ajax-confirm="confirm" data-ajax-complete="jsComplete" 
 //data-ajax-begin="jsBegin" data-ajax="true">
 //  <i class="glyphicon glyphicon-pencil"></i>
 //  <span>Edit</span>
 //</a>

 var builderI = new TagBuilder("i");
 builderI.MergeAttribute("class", "glyphicon " + glyphicon);
 string iTag = builderI.ToString(TagRenderMode.Normal);

 string spanTag = "";
 if (!string.IsNullOrEmpty(linkText))
 {
  var builderSPAN = new TagBuilder("span");
  builderSPAN.InnerHtml = " " + linkText;
  spanTag = builderSPAN.ToString(TagRenderMode.Normal);
 }

 //Create the "a" tag that wraps
 var builderA = new TagBuilder("a");

 var requestContext = HttpContext.Current.Request.RequestContext;
 var uh = new UrlHelper(requestContext);

 builderA.MergeAttribute("href", uh.Action(actionName, controllerName, routeValues));

 //Ajax section
 builderA.MergeAttribute("data-ajax", "true");
 builderA.MergeAttribute("data-ajax-update", ajaxOptions.UpdateTargetId.StartsWith("#") ? ajaxOptions.UpdateTargetId : "#" + ajaxOptions.UpdateTargetId);
   
 if (!string.IsNullOrEmpty(ajaxOptions.InsertionMode.ToString()))
  builderA.MergeAttribute("data-ajax-mode", ajaxOptions.InsertionMode.ToString());            
 
 if (!string.IsNullOrEmpty(ajaxOptions.OnBegin))
  builderA.MergeAttribute("data-ajax-begin", ajaxOptions.OnBegin);
 
 if (!string.IsNullOrEmpty(ajaxOptions.OnComplete))
  builderA.MergeAttribute("data-ajax-complete", ajaxOptions.OnComplete);
   
 if (!string.IsNullOrEmpty(ajaxOptions.OnFailure))
  builderA.MergeAttribute("data-ajax-failure", ajaxOptions.OnFailure);
   
 if (!string.IsNullOrEmpty(ajaxOptions.OnSuccess))
  builderA.MergeAttribute("data-ajax-success", ajaxOptions.OnSuccess);
   
 if (!string.IsNullOrEmpty(ajaxOptions.Confirm))
  builderA.MergeAttribute("data-ajax-confirm", ajaxOptions.Confirm);
  
 if (!string.IsNullOrEmpty(ajaxOptions.HttpMethod))
  builderA.MergeAttribute("data-ajax-method", ajaxOptions.HttpMethod);

 if (htmlAttributes != null)
 {
  IDictionary<string, object> attributes = new RouteValueDictionary(htmlAttributes);
  builderA.MergeAttributes(attributes);
 }

 builderA.InnerHtml = iTag + spanTag;

 return new MvcHtmlString(builderA.ToString(TagRenderMode.Normal));
}


As you can see, the code is similar to the one we've seen in the other posts but with the exception of the fact we are extending an "AjaxHelper" insetead of  an "HtmlHelper" and the add of the "ajax section"

Thursday, July 10, 2014

Visual Studio Online licenses will change (in better)

Through the fall and spring, Visual Studio Online transitioned from Preview to General Availability.  That process included changes to branding, the SLA, the announcement of pricing, the end of the early adopter program and more.

Now, the VSO/TFS team has decided to roll out these 2 major licensing changes in the next couple of months:

  • any VS Online account will be able to have an unlimited number of “Stakeholder” users with access to the a subset of functionality, at no charge.
  • the Visual Studio Online Advanced plan will include access to all of the Test hub functionalities 


The team is working hard to implement these licensing changes now and the expectation is that they’ve got about 2 sprints of work to do to get it all finished.  That would put the effective date somewhere in the neighborhood of mid-August.

In general, the team goal is to keep the licensing for VS Online and Team Foundation Server as “parallel” as they can – to limit how confusing it could be.  As a result, they will be evolving the current “Work Item Web Access” TFS CAL exemption (currently known as “Limited” users in TFS) to match the “Stakeholder” capabilities.  That will result in significantly more functionality available to TFS users without CALs.  The hope is to get that change made for Team Foundation Server 2013 Update 4.


Here you can find the original announcement by Brian Harry:
http://blogs.msdn.com/b/bharry/archive/2014/07/09/upcoming-vs-online-licensing-changes.aspx

Wednesday, July 9, 2014

ASP.net MVC ActionLink with Image: Part 2 (using Images)

In my previous post I talked about creating a custom helper to render an ActionLink with a Glyph image.

In this post I will show how to create a similar helper but using "normal" images instead of bootstrap glyphs.

/// <summary>
/// Create an ActionLink with an associated image
/// </summary>
/// <param name="htmlHelper"></param>
/// <param name="linkText"></param>
/// <param name="actionName"></param>
/// <param name="controllerName"></param>
/// <param name="imagePath"></param>
/// <param name="routeValues"></param>
/// <param name="htmlAttributes"></param>
/// <returns></returns>
public static MvcHtmlString ImageImgActionLink(this HtmlHelper htmlHelper, string linkText, string actionName, string controllerName, string imagePath, object routeValues = null, object htmlAttributes = null)
{
 //Exemple of result:
 //<a href="@Url.Action("Edit", new { id = Model.id_rod })">
 //  <i class="glyphicon glyphicon-pencil"></i>
 //  <span>Edit</span>
 //</a>

 if (imagePath.StartsWith("~/"))
 {
  imagePath = VirtualPathUtility.ToAbsolute(imagePath);
 }

 var builderImage = new TagBuilder("image");
 builderImage.MergeAttribute("src", imagePath);
 builderImage.MergeAttribute("alt", linkText);
 builderImage.MergeAttribute("style", "border=0");
 string imageTag = builderImage.ToString(TagRenderMode.SelfClosing);

 string spanTag = "";
 if (!string.IsNullOrEmpty(linkText))
 {
  var builderSPAN = new TagBuilder("span");
  builderSPAN.InnerHtml = " " + linkText;
  spanTag = builderSPAN.ToString(TagRenderMode.Normal);
 }

 //Create the "a" tag that wraps
 var builderA = new TagBuilder("a");

 var requestContext = HttpContext.Current.Request.RequestContext;
 var uh = new UrlHelper(requestContext);

 builderA.MergeAttribute("href", uh.Action(actionName, controllerName, routeValues));

 if (htmlAttributes != null)
 {
  IDictionary<string, object> attributes = new RouteValueDictionary(htmlAttributes);
  builderA.MergeAttributes(attributes);
 }

 builderA.InnerHtml = imageTag + spanTag;

 return new MvcHtmlString(builderA.ToString(TagRenderMode.Normal));
}


You can pass to the helper both absolute urls or relative urls (as imagePath) so it gives you total flexibility.

Monday, July 7, 2014

ASP.net MVC ActionLink with Image: Part 1 (using Glyph)

If you are using ASP.net MVC you surely know that there is an helpful helper to create a link that points to an Action of a controller: it's the Html.ActionLink.

You can use this helper only with text, but what about if you want to add to the link a glyph image, like in this example?


Well, the "fast&dirty" answer is to write some html directly in the cshtml page. Something like:

<a href="@Url.Action("Edit", new { id = Model.id })">
  <i class="glyphicon glyphicon-pencil"></i>
  <span>Edit</span>
</a>


This approach is faster that any other, if you need to have it only in few places. But what about if you have to use it spread all around you application (as in my case?). You will have to copy&paste the code all around and then change it. Not so good...

The better way to do it, in this case, is to write a custom helper that will do it for you.

/// <summary>
/// Create an ActionLink with an associated glyphicon
/// </summary>
/// <param name="htmlHelper"></param>
/// <param name="linkText"></param>
/// <param name="actionName"></param>
/// <param name="controllerName"></param>
/// <param name="glyphicon"></param>
/// <param name="routeValues"></param>
/// <param name="htmlAttributes"></param>
/// <returns></returns>
public static MvcHtmlString ImageActionLink(this HtmlHelper htmlHelper, string linkText, string actionName, string controllerName, string glyphicon, object routeValues = null, object htmlAttributes = null)
{
 //Exemple of result:
 //<a href="@Url.Action("Edit", new { id = Model.id_rod })">
 //  <i class="glyphicon glyphicon-pencil"></i>
 //  <span>Edit</span>
 //</a>

 var builderI = new TagBuilder("i");
 builderI.MergeAttribute("class", "glyphicon " + glyphicon);
 string iTag = builderI.ToString(TagRenderMode.Normal);

 string spanTag = "";
 if (!string.IsNullOrEmpty(linkText))
 {
  var builderSPAN = new TagBuilder("span");
  builderSPAN.InnerHtml = " " + linkText;
  spanTag = builderSPAN.ToString(TagRenderMode.Normal);
 }            

 //Create the "a" tag that wraps
 var builderA = new TagBuilder("a");

 var requestContext = HttpContext.Current.Request.RequestContext;
 var uh = new UrlHelper(requestContext);
 
 builderA.MergeAttribute("href", uh.Action(actionName, controllerName, routeValues));

 if (htmlAttributes != null)
 {
  IDictionary<string, object> attributes = new RouteValueDictionary(htmlAttributes);
  builderA.MergeAttributes(attributes);
 }
  
 builderA.InnerHtml = iTag + spanTag;
 
 return new MvcHtmlString(builderA.ToString(TagRenderMode.Normal));
}

At this point it will be possible to invoke the Html.ImageActionLink helper in the same way and with the same parameters that we will use with the "normal" Html.ActionLink plus the glyphicon class of the glyph image we wanna add to the link.

Wednesday, July 2, 2014

Delete work items from TFS or VSO

Have you ever created a bunch of work items that you decided later that you had to delete. Well I have… especially as a user of the TFS Integration Platform. And when things go wrong there they can really go wrong.

Now while you can put stuff into the “removed” state it is still hanging around cluttering up the place. The only way out of the box to remove items is to give the ID for each work item that you want to delete and execute the command line for each one:

witadmin destroywi /collection:CollectionURL /id:id [/noprompt]

Well that’s just great unless you have a couple of thousand things to delete. 
So I've written a little bit of code to do it for me; in this example I created a small console program but you can use the same code in any kind of project.

using Microsoft.TeamFoundation.Client;
using Microsoft.TeamFoundation.WorkItemTracking.Client;

[...]

TfsTeamProjectCollection tpc = new TfsTeamProjectCollection(new Uri("http://your_tfs_url:8080/tfs/CollectionName"));
WorkItemStore store = tpc.GetService();

string query = @"SELECT [System.Id] FROM WorkItems WHERE [System.TeamProject] = 'projectName'  AND  [System.AreaPath] UNDER 'projectName\_TOBEDELETED' ORDER BY [System.Id]";

WorkItemCollection wis = store.Query(query);
var wisIds = wis.Select( wi => wi.Id);

Console.WriteLine(string.Format("DESTROY {0} work items (they really can't be resurrected): y/n?", wis.Count));
ConsoleKeyInfo cki = Console.ReadKey();
Console.WriteLine();

if (cki.Key.ToString().ToLower() == "y")
{
 try
 {
  Console.WriteLine("Deleting....");
  var items = store.DestroyWorkItems(wisIds.ToArray());
  Console.WriteLine("DONE");
  foreach (var item in items)
  {
   Console.WriteLine(item.ToString());
  }
 }
 catch (Exception ex)
 {
  [...]
 }

}

Console.WriteLine("Finished");


The first thing that you may notice is that I search for items in a specific area path. I use _TOBEDELETED as it is obvious what is going to happen to things that end up there. Although I did work with a user who complained that all his files had gone missing. When asked where he kept them he pointed at the recycle bin on his desktop!

Anyhow, just in case you made a mistake it will let you know how many work items that you are deleting. It’s a simple check but I have had it say "100000" work items... AS you can imagine I very carefully terminated the program (never trust the 'no' option).

Tuesday, May 27, 2014

Autoscale Virtual Machines on Microsoft Azure

One of the key benefits that the Windows Azure platform delivers is the ability to rapidly scale your application in the cloud in response to fluctuations in demand.

Normally people scale their website or cloud services, but what if you have your applications hosted on an Azure VM and you want to be able to horizontally scale it? Well, it also possible!

You have to do basically 2 steps: create a Load Balanced Web Farm and then configure the AutoScale.

Here you will find a step-by-step guide on how to do it.


Necessary Steps:

  1. Create a Standard Tier VM and assign it to an availability set
  2. Configure the machine as you need (IIS, Application server, ftp, and so on...)
  3. Clone the VM
    1. Sysprep 
    2. Capture
    3. Recreate the original VM, adding all the needed endpoints
    4. Create the second  VM with no "extra endpoints"
    5. Optional - repeat point 3.4 to create additional VMs
  4. Balance VMs
    1. Change the endpoint on the first VM  to create a Load-Balanced set
    2. Add the endpoint to the second (third, ...) VM to the created Load-Balanced set
    3. Repeat 4.1 and 4.2 for all the endpoints you need to be balanced
    4. Takes care of session state (if needed)
  5. Configure Autoscale

Details:

3.1 - Sysprep
The first thing to do when cloning a VM is "sysprepping" it. On Linux, there’s a similar option in the Azure agent. Sysprep ensures the machine can be cloned into a new machine, getting it’s own settings like a hostname and IP address. A non-sysprepped machine can thus never be cloned.


After sysprepping the machine, shut it down. If you’ve selected the option during sysprep, the machine will automatically shutdown. Otherwise you can do so through remote desktop or SSH, or simply through the Azure portal.

3.2 - Capture
On the Windows Azure portal go to the VM dashboard page. Next, click the "Capture" button to create a disk image from this machine. Give it a name and check the "Yes, I’ve sysprepped the machine" checkbox in order to be able to continue.


After clicking the "OK" button, Azure will create an image of our first server.

3.3 - Recreate the original VM, adding all the needed endpoints
After the image has been created, you’ll notice that your first VM has disappeared! This is normal: the machine has been disemboweled in order to create a template from it. You can now simply re-create this machine using the same settings as before, except you can now base it on this newly created VM image instead of basing it off a VM template Microsoft provides.

In the endpoints configuration, make sure to add the HTTP endpoint again listening on port 80 or, however, all the endpoints you need to access your applications.

3.4 - Create the second  VM with no "extra endpoints"
To create the second machine in your webfarm, create a fresh virtual machine. As before, choose the image we’ve created earlier.
In step 4 of the machine creation, be sure to select the same "Cloud Service" of the first server and locate the VM in the same availability set. 


Don’t add the HTTP endpoint (or other endpoints configured in the step 3.3) to this machine just yet.

You now have two machines running, yet they aren’t load balanced at this moment. You’ll notice that both machines are already behind the same hostname and that they share the same public virtual IP address. This is due to the fact that we "linked" the machines earlier. If you don’t, you will never be able to use the out-of-the-box load balancer that comes with Azure. This also means that the public remote desktop endpoint for both machines will be different: there’s only one IP address exposed to the outside world so you’ll have to think about endpoints.

4.1 - Change the endpoint on the first VM  to create a Load-Balanced set
The last part of setting up our webfarm will be load balancing.  This is in fact really, really easy. 
As first point, go the "Endpoints" page of the first (original) VM, choose the Endpoint you want to balance and edit it.
Just check the "Create a Load-Balance set" checkbox.


In the step 2 of the edit, give the Load-Balanced set a name and configure the probe parameters (in my example, I'm configuring an HTTPS endpoint, so I want to check every 15 second if the port 443 answers. After 2 fails, the balancer switch to the other endpoint)

4.2 - Add the endpoint to the second (third, ...) VM to the created Load-Balanced set
Simply go to second machine’s dashboard in the Azure portal and navigate to the Endpoints tab. We’ve already added public HTTPS endpoint on our first machine, which means for our second machine we can just subscribe to load balancing:


Now we have free round-robin load balancing with checks every few seconds to ensure that all machines are up and running. And since we linked these machines through an availability set, they are on different fault domains in the datacenter reducing the chance of errors due to malfunctioning hardware or maintenance. You can safely shut down a machine too. In short: anything you’d expect from a load balancer (except sticky sessions).

4.4 - Takes care of session state (if needed)
Now that you have the VMs balanced, you have to think about how your applications manage the session state.
If you are deploying web servers with Asp.Net applications, for example, you’ll have to configure machine keys and sessione state in the same way you would do it on-premise. On Azure you can choose to user the "normal" database way (Session state stored on Azure database), you can use the Azure storage or the new Azure cache.

You can visit this link on msdn (http://blogs.msdn.com/b/cie/archive/2013/05/17/session-state-management-in-windows-azure-web-roles.aspx) to have an overview about Session State management on Azure.

5 - Configure Autoscale
Ok, finally let's configure the autoscale! Now we have some VMs running, balanced. But do we need all the VMs running at the same time? Maybe not. We maybe need to have it running on some time periods, or maybe only if under load.

If you remember when you've created the VMs you have choosen the same cloud service for all of them. To configure the autoscale on the VMs, just go to the Cloud Service related to them and navigate to the "Scale" page.

Here you can choose the type of scale you want: None (no scale...), by Cpu or by Queue. 


In my case, I decided to scale using the CPU percentage as parameter. The "Target CPU" slider says that I want to scale up when the average CPU is over 80% and to scale down when it is under 60%. 

I have only 2 VMs, so I can configure that normally only 1 is active and the second will be activate to scale up.

You can also choose to scale based on time settings.

Thursday, April 17, 2014

Work Item Query Language in URL with TFS2013

As many of you surely already know, it's possible to wuery work items in TFS sending a direct url to the server.

In TFS 2008/2010 the url syntax was:

http://<ServerAddress>:8080/tfs/<TPC Name>/q.aspx?pname=<Project>&wiql=<WIQL>

But in TFS 2012/2013 it doesn't work. Indeed, they have changed the url format to the following:

http://<ServerAddress>:8080/tfs/<TPC Name>/<Project>/_workitems#_a=query&wiql=<WIQL>

Where:
TPC Name  is the name of the project collection
Project is the name of the project you want to query against
WIQL is the query written in the "Work Item Query Language"

Tuesday, April 15, 2014

Azure Updates: Web Sites, VMs, Mobile Services, Notification Hubs, Storage, VNets, Scheduler, AutoScale and More

It has been a really busy last 10 days for the Azure team. This blog post quickly recaps a few of the significant enhancements they’ve made.  These include:

Web Sites: SSL included, Traffic Manager, Java Support, Basic Tier
Virtual Machines: Support for Chef and Puppet extensions, Basic Pricing tier for Compute Instances
Virtual Network: General Availability of DynamicRouting VPN Gateways and Point-to-Site VPN
Mobile Services: Preview of Visual Studio support for .NET, Azure Active Directory integration and Offline support
Notification Hubs: Support for Kindle Fire devices and Visual Studio Server Explorer integration
Autoscale: General Availability release
Storage: General Availability release of Read Access Geo Redundant Storage
Active Directory Premium: General Availability release
Scheduler service: General Availability release
Automation: Preview release of new Azure Automation service

All of these improvements are now available to use immediately (note that some features are still in preview).

See this Scott Guthrie's blog post to discover all the details

Wednesday, March 12, 2014

Visual Studio Online (VSO) vs Team Foundation Server (TFS)

This blog post compare the current feature set of Microsoft's hosted TFS solution – Visual Studio Online (VSO) and the on-premises Team Foundation Server product.

Feature Comparison
TFS
VSO
Work Items, Version Control, & Build
Yes
Yes
Agile Product/Project Management
Yes
Yes
Test Case Management
Yes
Yes
Heterogeneous Development (Eclipse, Git, ...)
Yes
Yes
Ease of Installation and Setup
+/-
++
Collaborate with anyone, from anywhere
+/-
++
Data stays inside your network
Yes
No
Process Template & Work Item Customization
Yes
No
SharePoint Integration
Yes
No
Data Warehouse & Reporting
Yes
No
CodeLens Support
Yes
No
Cloud Load Testing
No
Yes
Application Insights
No
Yes
Always running the latest version of TFS
No
Yes

Some other limitations of VSO (currently):

  • No Data Export (there are plans to make it available for a short time period)
  • No Data Import (if you want to move from on-premises TFS to VSO)
  • No Integration with Active Directory (users sign in using Microsoft Accounts)
  • No choice of geographic location (data stored in data center in Chicago)